A Guide on How To Turn Your iPhone Into A Magnifying Glass
For many of us, our multitasking iPhones have replaced many other tools and gadgets, like notepads, calculators, torches, and even our GPS units in performing several tasks. There’s one more item your iPhone can replace — a magnifying glass. A magnifying glass is a convex lens that is used to produce a magnified image of an object. The lens is usually mounted in a frame with a handle.
In this post, We’ll be giving a complete guide on how to interact with the iPhone’s Magnifier app. . Because who has one of those magnifying glass on hand when they need it?
The iPhone’s Magnifier app
This is a super useful free tool present in the iPhone that allows you to magnify objects with just your iPhone’s camera. Magnifier uses your iPhone’s built-in camera to enlarge objects or text so you can view them more easily and more enlarged. This app allows you to increase the zoom level and turn on the flashlight to better display objects and text. You can also adjust the image brightness and contrast, and apply color filters to the magnified image. Plus, there’s also an option to freeze one or more frames to review them.

How To Set-up the Magnifier app on your iPhone
The best place to access the Magnifier app is via your iPhone’s “Control Center.” This is the shortcut screen pulled up when you swipe down the top right-hand side of your iPhone screen. By default, the magnifier app shortcut icon is not present in the control center but you can add it by following the steps below:
- Open your iPhone’s Settings app and scroll down to see “Control Center.”
- Tap on it
- In the next screen, you’ll see your current Control Center setup, which lists included controls at the top of the screen, and more controls you have the choose to add at the bottom
- Look for the Magnifier option and tap on the green plus sign icon beside it
- Magnifier will now be added to your Control Center options.
To reorder your Control Center shortcut icons, go back into Settings, then Control Center, and tap on the three lines that appear next to each tool. Drag and drop to rearrange.
How To Use the iPhone’s Magnifier app
Now that you’ve added the Magnifier icon to your iPhone’s Control Center, whenever you want to use it, simply swipe down on the right-hand side of your iPhone’s screen and tap on the Magnifier shortcut icon.
This will launch the app, and you’ll see your live view window at the top of the screen and Magnifier’s various controls at the bottom.
iPhone Magnifier App controls
- Adjust the zoom level: Drag the zoom control slider left or right.
- Switch to the front or back camera: Tap the camera-with-arrows switch camera button, then tap front or back.
- Adjust the brightness: Tap the sun-shaped brightness button
- Adjust the contrast: Tap the two-tone circle contrast button
- Apply color filters: Tap the Venn diagram filters button.
- Turn on your iPhone’s flashlight: Tap the flashlight-shaped button.
- Save a magnified object as an image: Tap the large central freeze-frame button.
- Share a magnified object as an image: Tap the share icon at the top right of your screen.
How to customize your Magnifier app’s controls
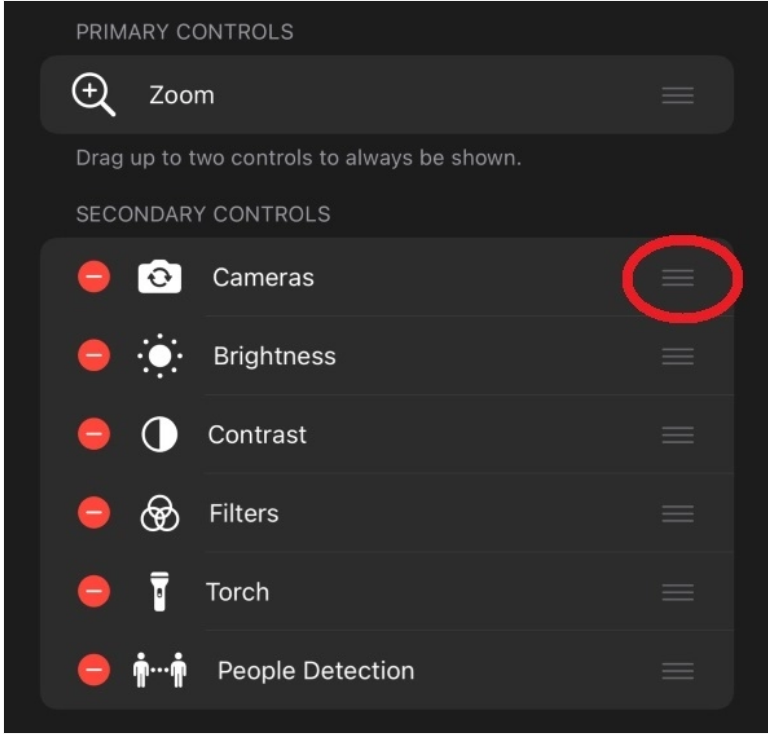
For most iPhone owners the default setup of the Magnifier’s controls will be more than adequate. However, You can decide to customize how the Magnifier’s controls appear on your screen. To do this, when in the Magnifier app, tap on the cog-shaped icon at the bottom left of your screen. In the next screen, you can drag and drop by tapping on the three lines icons to change the order of the controls. You can also choose to set any two options as primary controls.
That’s it. With all these steps highlighted above, you can now familiarize yourself and enjoy this tool.
Related Posts
-
 X is set to introduce a groundbreaking feature that empowers users to sort profiles
-
 Geoffrey Hinton, Godfather of AI, Resigns from Google to Speak Out Against AI Dangers
-
 Apple Card Users Anticipate Imminent Launch of Savings Account Feature
-
 Samsung Launches Galaxy A14 4G in India: Affordable Powerhouse with Impressive Features